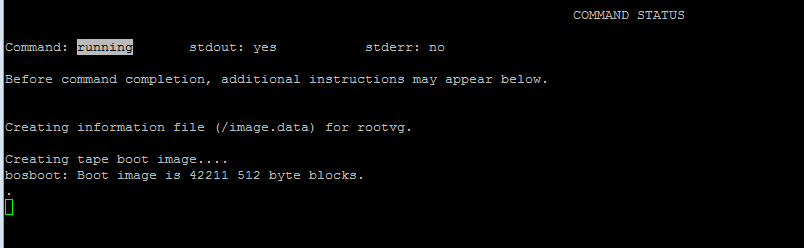
Wednesday, October 24, 2012

Tuesday, October 23, 2012

Calculating interval in seconds and snapshots for nmon

Tuesday, October 23, 2012 0 Comments
I am tired of poring thru geek-blogs looking for a decent nmon calculation to use when configuring nmon report collection on Linux hosts. So, I did what I had to do. I am going to provide you the method used to calculate the time interval between reports [ the -s option] and the snapshots count [ -c]

Lets take an example from one of my crontabs

00 21 9 5 *  /usr/local/bin/nmon -f -t -r "Performance Report:Brocade" -s 300 -c 288 -m /var/nmon_reports

So, what does this mean in English?

/usr/local/bin/nmon = this is where the nmon is located and will run from there


-f =spreadsheet output format [note: default -s300 -c288] or in simple terms it means you want the data saved to a file and not displayed on the screen

-t = spreadsheet includes top processes


-r "Performance Report:Brocade" = goes into spreadsheet file [default hostname unless specified]


-s 300 = you want to capture data every 300 seconds (5 minutes)

-c 288 = you want 288 points or snap shots


-m /var/nmon_reports/= nmon changes to this directory to write the reports

Ok, so how do we get the interval and snapshots value? What are the best intervals to use? Well, this really depends on you and how smart you are at looking into your head to picture the final graphs. Do you want a pretty graphs presentable for end user or a hefty report that will satisfy your queries? I suggest you go for the former. If you go for a nice interval of 10-30 minutes your graphs will look pretty presentable. Plus your snapshots won't be fighting over each other to write into your report, so there's a nice amount of white space in your graph. However, I am not saying you should not use short intervals, you may use them-but only to collect nmon for short period of time [i.e less than 5 hours ]

Generally, nmon uses seconds as interval so I recommend you to use seconds in your calculation. Lets start with the first example. If you want a report to run every 15 minutes for 1 day, you get the 1 day value in seconds

1 day = 24 hours x 60 mins x 60 seconds = 86 400 seconds

Then, you get the interval time period of 15 mins in seconds

15 mins = 60 seconds x 15 mins = 900 seconds

Now, you know your interval is 900 seconds, so the value for your "-s" is 900

-s = 900

How do you get your snapshot value?

86 400/900 = 96 snapshots

So your "-c" value is 96

Answer: -s 900 -c 96

Lets use the same math to get a calculation for nmon to run, say every 15 seconds for 1 hour

1 hour = 60 mins x 60 seconds = 3600 seconds
15 seconds = 15 seconds
-s = 15
-c = 3600/15 = 240

Answer : -s 15 -c 240

Because I feel like giving today, I'll provide another example to collect nmon report for 6 days with 30 mins interval

6 days = 6 days x 24 hours x 60 mins x 60 seconds = 518 400
30 mins interval = 30 x 60 seconds = 1800 seconds
-s = 1800
-c = 518 400/1800 = 288 snapshots

Answer : -s 1800 -c 288 

To download nmon for linux, go here:
http://nmon.sourceforge.net/pmwiki.php?n=Main.HomePage

To download nmon analyzer, go here:
http://www.ibm.com/developerworks/wikis/display/Wikiptype/nmonanalyser

Tuesday, October 16, 2012

AIX 5.3 NTP client sync with Linux server

Tuesday, October 16, 2012 0 Comments
I'm going to discuss two issues here, namely 

  • Setting TZ settings on AIX 5.3
  • Configuring AIX 5.3 as client NTP to a Linux NTP server
I had two AIX 5.3 machines, and the time zones on these machines were not configured properly. The customers are based in Eastern Australia and with DST in place, they go from +3 hours to +2 hours ahead of us here in Malaysia. Initially my /etc/environment had these settings:

# more /etc/environment | grep ET

TZ=EET-2EEST,M3.5.0,M10.5.0


In English this meant that the DST started on M3.5.0 March (3) on the Sunday (0) of the fifth week (5)

You see whats going on here. If March doesn't have a fifth Sunday the bloody setting wont work!

What's even worse is that the switch back is set to M10.5.0 October (10) on the Sunday (0) of the fifth week (5)

October doesn't have 5 weeks so again the switch back isn't going to work

So I had to smitty and correct this setting

# smit chtz

Answer "1 yes" to "Use Daylight Saving Time?"


I chose Eastern Australia time zone. Once that was done, I rebooted the server and went on with the NTP syncing because the minutes were way too offset on these two boxes.

You know you have the right configuration when your /etc/environment makes "sense"

TZ=EET-10EETDT,M10.1.0,M4.1.0/03:00:00
Switch back=M4.1.0 First Sunday in April
DST=M10.1.0 First Sunday in October
03:00:00=both DST changes will occur at 3am


After a reboot to verify things were OK, I went on to sync the AIX hosts as client servers to a Linux host acting as a NTP server

1. Checked if I could ping and sync with NTP server

# ntpdate -d xxx
16 Oct 18:55:43 ntpdate[180314]: 3.4y
transmit(203.xxx)
receive(203.xxx)
transmit(203.xxx)
receive(203.xxx)
transmit(203.xxx)
receive(203.xxx)
transmit(203.xxx)
receive(203.xxx)
transmit(203.xxx)
server 203.xxx, port 123
stratum 3, precision -20, leap 00, trust 000
refid [61.110.197.50], delay 0.02597, dispersion 0.00002
transmitted 4, in filter 4
reference time:      d4278bac.df67e404  Tue, Oct 16 2012 18:30:52.872
originate timestamp: d4279180.dbad9820  Tue, Oct 16 2012 18:55:44.858
transmit timestamp:  d427917f.feabc000  Tue, Oct 16 2012 18:55:43.994
filter delay:  0.02634  0.02599  0.02599  0.02597
               0.00000  0.00000  0.00000  0.00000
filter offset: 0.863287 0.863137 0.863115 0.863123
               0.000000 0.000000 0.000000 0.000000
delay 0.02597, dispersion 0.00002
offset 0.863123

16 Oct 18:55:43 ntpdate[180314]: step time server 203.xxx offset 0.863123

The offset must be less than 1000 seconds for xntpd to synch. If the offset is greater than 1000 seconds, change the time manually on the client with #smitty date command and run the ntpdate -d again. I had to open two putty sessions, running pararel with the NTP server and run date commands on each server to check if the client server's seconds synced with the host server's seconds. The best I could come up with was 0.863123 offset

Then I edited the NTP config file to add the NTP server FQDN and IP address

vi /etc/ntp.conf

#broadcastclient
server ip.address.of.NTP.server
driftfile /etc/ntp.drift
tracefile /etc/ntp.trace

After that I restarted the NTP services on the client server

# stopsrc -s xntpd
0513-044 The /usr/sbin/xntpd Subsystem was requested to stop.
# startsrc -s xntpd
0513-059 The xntpd Subsystem has been started. Subsystem PID is 143404.

Please remember to uncomment the NTP services from system start up script so NTP will run persistently across reboots

# vi /etc/rc.tcpip
start /usr/sbin/xntpd "$src_running"


Lastly, check if the NTP services is in sync with NTP server
# lssrc -ls xntpd
 Program name:    /usr/sbin/xntpd
 Version:         3
 Leap indicator:  11 (Leap indicator is insane.)
 Sys peer:        no peer, system is insane
 Sys stratum:     16
 Sys precision:   -18
 Debug/Tracing:   DISABLED
 Root distance:   0.000000
 Root dispersion: 0.000000
 Reference ID:    no refid, system is insane
 Reference time:  no reftime, system is insane
 Broadcast delay: 0.003906 (sec)
 Auth delay:      0.000122 (sec)
 System flags:    pll monitor filegen
 System uptime:   305 (sec)
 Clock stability: 0.000000 (sec)
 Clock frequency: 0.000000 (sec)
Subsystem         Group            PID          Status
 xntpd            tcpip            143404       active
NOTE: Sys peer should display the IP address or name of your NTP server. This process may take up to 12 minutes

But after 12 minutes, I am still getting system is "insane" message BUT it detected the Linux NTP server as its host

# lssrc -ls xntpd
Program name: /usr/sbin/xntpd
Version: 3
Leap indicator: 11 (Leap indicator is insane.)
Sys peer: no peer, system is insane
Sys stratum: 16
Sys precision: -18
Debug/Tracing: DISABLED
Root distance: 0.000000
Root dispersion: 0.000000
Reference ID: no refid, system is insane
Reference time: no reftime, system is insane
Broadcast delay: 0.003906 (sec)
Auth delay: 0.000122 (sec)
System flags: pll monitor filegen
System uptime: 15 (sec)
Clock stability: 0.000000 (sec)
Clock frequency: 0.000000 (sec)
Peer: xxxx.com.my
flags: (configured)
stratum: 3, version: 3
our mode: client, his mode: server
Subsystem Group PID Status
xntpd tcpip 188452 active


Then I went one step ahead and added a second NTP host [ also a Linux server] into the /etc/ntp.conf

# vi /etc/ntp.conf

#broadcastclient
server 203.xxx
server 203.xxx
driftfile /etc/ntp.drift
tracefile /etc/ntp.trace


Then I restarted NTP services and ran the lssrc command again

# stopsrc -s xntpd
0513-044 The /usr/sbin/xntpd Subsystem was requested to stop.

# startsrc -s xntpd
0513-059 The xntpd Subsystem has been started. Subsystem PID is 163954.


# lssrc -ls xntpd

Program name: /usr/sbin/xntpd
Version: 3
Leap indicator: 11 (Leap indicator is insane.)
Sys peer: no peer, system is insane
Sys stratum: 16
Sys precision: -18
Debug/Tracing: DISABLED
Root distance: 0.000000
Root dispersion: 0.000000
Reference ID: no refid, system is insane
Reference time: no reftime, system is insane
Broadcast delay: 0.003906 (sec)
Auth delay: 0.000122 (sec)
System flags: pll monitor filegen
System uptime: 5 (sec)
Clock stability: 0.000000 (sec)
Clock frequency: 0.000000 (sec)
Peer: xxx.com.my
flags: (configured)
stratum: 3, version: 3
our mode: client, his mode: server
Peer: xxx.com.my
flags: (configured)
stratum: 2, version: 3
our mode: client, his mode: server
Subsystem Group PID Status
xntpd tcpip 163954 active


# ntpq -p
remote refid st t when poll reach delay offset disp

==============================================================================

myxxx 61.110.197.50 3 u 18 64 1 0.43 0.000 15875.0
my-xxx E210168211231.e 2 u 17 64 1 0.31 0.966 15875.0


When I checked again today, the system peer is no longer "insane" but it picked up one of the two NTP servers I had added to sync:

# lssrc -ls xntpd
Program name: /usr/sbin/xntpd
Version: 3
Leap indicator: 00 (No leap second today.)
Sys peer: xxx.com.my
Sys stratum: 3
Sys precision: -18
Debug/Tracing: DISABLED
Root distance: 0.165695
Root dispersion: 0.145218
Reference ID: 203.115.199.30
Reference time: d428ca78.f598d000 Wed, Oct 17 2012 17:11:04.959
Broadcast delay: 0.003906 (sec)
Auth delay: 0.000122 (sec)
System flags: pll monitor filegen
System uptime: 76814 (sec)
Clock stability: 43.771896 (sec)
Clock frequency: 48.000000 (sec)
Peer: yyy.com.my
flags: (configured)(sys peer)
stratum: 3, version: 3
our mode: client, his mode: server
Peer: xxx.com.my
flags: (configured)(sys peer)
stratum: 2, version: 3
our mode: client, his mode: server
Subsystem Group PID Status
xntpd tcpip 127374 active


And folks, thats how you sync AIX NTP client with Linux NTP server!

Sunday, October 14, 2012

Wedding Gifts Shopping

Sunday, October 14, 2012 1 Comments
I didn't like the idea of giving cash to the groom's family because you know how people work. If you don't give them enough cash they whine about it, so I thought hard and the answer came easy. What's the most convenient gift for men of all ages and a female child? Why a pack of handkerchiefs and a trinket box! You can't go wrong with that!

So are shot by shot of me fixing them up. It was neither cheap, nor was it too expensive.


Gifts for his sisters and his aunts, not because they deserve it but its the right thing to do

Thursday, October 11, 2012

Tuesday, October 9, 2012

Configuring logwatch on Linux

Tuesday, October 09, 2012 0 Comments

I customized my logwatch to include wtmp log report also.

1. Download the logwatch tar file from the internet. The latest running version is logwatch-7.4.0

2. Look here for the version-------------http://sourceforge.net/projects/logwatch/files/

3. Look here for developer details---http://logwatch.isoc.lu/tabs/docs/index.html

4. Download and store the tarball into your /tmp directory

5. Unzip, untar and cd into the folder

gunzip logwatch-7.4.0.tar.gz

tar xvf logwatch-7.4.0.tar


cd logwatch-7.4.0


6. Create these directories and soft links:

mkdir /etc/logwatch
mkdir /etc/logwatch/scripts
mkdir /etc/logwatch/conf
mkdir /etc/logwatch/conf/logfiles
mkdir /etc/logwatch/conf/services
touch /etc/logwatch/conf/logwatch.conf
touch /etc/logwatch/conf/ignore.conf
touch /etc/logwatch/conf/override.conf

mkdir /usr/share/logwatch

mkdir /usr/share/logwatch/dist.conf
mkdir /usr/share/logwatch/dist.conf/logfiles
mkdir /usr/share/logwatch/dist.conf/services

mv conf/ /usr/share/logwatch/default.conf

mv scripts/ /usr/share/logwatch/scripts
mv lib /usr/share/logwatch/lib

mkdir /var/cache/logwatch

ln -s /usr/share/logwatch/scripts/logwatch.pl /etc/cron.daily/0logwatch
ln -s /usr/share/logwatch/scripts/logwatch.pl /usr/sbin/logwatch

7. Backup and edit the config file accordingly

 /usr/share/logwatch/default.conf/logwatch.conf

##to edit html format, edit these lines in the config file stated above

#Output/Format Options
#By default Logwatch will print to stdout in text with no encoding.
#To make email Default set Output = mail to save to file set Output = file
#Output = stdout
Output = mail
#To make Html the default formatting Format = html
Format = html

##to edit the email recipients, edit this line, separate multiple recipients with space

# Default person to mail reports to.  Can be a local account or a
# complete email address.  Variable Output should be set to mail, or
# --output mail should be passed on command line to enable mail feature.
MailTo = oXXXXX@gmail.com

8. To add wtmp logs into logwatch monitoring you need to define three things:

  • the wtmp parsing script path
  • define the the new config into wtmp
  • add the wtmp log destination into logwatch configuration for parsing


8.1  /usr/share/logwatch/scripts/services ### this is where the script/work will be done

# pwd
/etc/logwatch/conf/logfiles 

# more /usr/share/logwatch/scripts/services/my-report

#!/usr/bin/perl
@type = (
    "Empty", "Run Lvl", "Boot", "New Time", "Old Time", "Init",
    "Login", "Normal",  "Term", "Account"
);
$recs = "";
while (<>) {
    $recs .= $_;
}
foreach ( split( /(.{384})/s, $recs ) ) {
    next if length($_) == 0 ;
    my ( $type, $pid, $line, $inittab, $user, $host, $t1, $t2, $t3, $t4, $t5 ) =
      $_ =~ /(.{4})(.{4})(.{32})(.{4})(.{32})(.{256})(.{4})(.{4})(.{4})(.{4})(.{4})/s;
    if ( defined $line && $line =~ /\w/ ) {
        $line =~ s/\
x00+//g;
        $host =~ s/\x00+//g;
        $user =~ s/\x00+//g;
        printf(
            "%s %-8s %-12s %10s %-45s \n",
            scalar( gmtime( unpack( "I4", $t3 ) ) ),
            $type[
              unpack( "
I4", $type )
            ],
            $user,
            $line,
            $host
        );
    }
}
printf "\n" 

8.2  /usr/share/logwatch/default.conf/services ### this is where you define the services/config options of your script above

 # more /usr/share/logwatch/default.conf/services/my-report.conf
Title = "WTMP logs"
Logfile = wtmp

8.3  /etc/logwatch/conf/logfiles ### this is where the log files will be parsed

# more /etc/logwatch/conf/logfiles/wtmp.conf
# Define log file group for wtmp log

Logfile = /var/log/wtmp

NOTE: The reason I had the wtmp and wtmp.conf config files in red is because both names must be same. Different names will call different logs and if that log doesn't exist on the server you will get error in your logwatch report

9. Logwatch emails

Accounting and auditing in AIX

Tuesday, October 09, 2012 0 Comments
Process accounting, as the name implies, records information about each and every processes executed on the system. This data can then be combined to produce reports on individual command usage and user usage. The reports can be used to track resource usage, productivity, assess process scheduling, and for billing purposes.

The data can also be refined to determine what commands were being executed on the system at a particular time, by which user, and which commands a particular user was executing at a particular time. This information can be invaluable when doing system forensics, such as researching potential security breaches, or employee misuse of the system

When enabled, the kernel writes a record of every completed process to the /usr/adm/pacct file. The record includes:
  • Data on the user ID
  • Command name
  • CPU and memory usage
  • Start and stop time
  • Disk reads and writes
  • Character I/O

Check to see if the fileset for process accounting is installed on your server, if its not then please install it from your CD or from IBM's website

# lslpp -L bos.acct
  Fileset                      Level  State  Type  Description (Uninstaller)
  ----------------------------------------------------------------------------
  bos.acct                  5.3.12.2    C     F    Accounting Services

Once you're done with that, then proceed with setting up process accounting directories, files and permissions

#touch /var/adm/pacct
#chmod 666 /var/adm/pacct
#su – adm -c /usr/lib/acct/nulladm /var/tmp/wtmp /var/adm/pacct
#su – root -c /usr/sbin/acct/startup     #ensure process start-up is persistent across reboots

2. Verify accounting has started

# ls -l /var/adm/pacct
-rw-rw-r--    1 adm      adm           68160 Oct 09 18:03 /var/adm/pacct

3. Display selected process accounting record summaries

# man acctcom
# acctcom

3. Edit the adm crontab to housekeep pacct file if exceed 10000 disk blocks

# crontab -e adm

#=================================================================
#      PROCESS ACCOUNTING:
#  runacct at 11:10 every night
#  dodisk at 11:00 every night
#  ckpacct every hour on the hour
#  monthly accounting 4:15 the first of every month
#=================================================================
#10 23 * * * /usr/lib/acct/runacct 2>/usr/adm/acct/nite/accterr > /dev/console
#0 23 * * * /usr/lib/acct/dodisk > /dev/console 2>&1
0 * * * * /usr/lib/acct/ckpacct > /dev/console 2>&1
#15 4 1 * * /usr/lib/acct/monacct > /dev/console 2>&1
#=================================================================

/usr/lib/acct/ckpacct checks the /var/adm/pacct file for size. If it exceeds 1000 disk blocks, ckpacct calls "turnacct switch" to close the current pacct file, renames it to a unique name (like pacct1), and then opens a new pacct file. This is to keep the pacct files to a manageable size. "ckpacct" also checks the amount of freespace in /var/adm and, if this dips below 500 blocks, process accounting is turned off with "turnacct off."

Note: ckpacct switches the pacct file in the event its size exceeds 1000 disk blocks. This is a legacy value. While that used to be considered a lot of disk space, it's still less than a floppy drive now. Feel free to override the default value by calling it as "ckpacct 400000" in crontab.

Perl Script to parse wtmp logs

Tuesday, October 09, 2012 0 Comments
I can't take credit for this fully, partly because I had some help from PerlMonks and from Linux & Unix forum to make this script work. So, I'll share it out with you folks. I have tested it on Suse and Redhat so it ought to work on these platforms for you as well

# vi wtmp.pl


#!/usr/bin/perl
@type = (
    "Empty", "Run Lvl", "Boot", "New Time", "Old Time", "Init",
    "Login", "Normal",  "Term", "Account"
);
$recs = "";
while (<>) {
    $recs .= $_;
}
foreach ( split( /(.{384})/s, $recs ) ) {
    next if length($_) == 0 ;
    my ( $type, $pid, $line, $inittab, $user, $host, $t1, $t2, $t3, $t4, $t5 ) =
      $_ =~ /(.{4})(.{4})(.{32})(.{4})(.{32})(.{256})(.{4})(.{4})(.{4})(.{4})(.{4})/s;
    if ( defined $line && $line =~ /\w/ ) {
        $line =~ s/\
x00+//g;
        $host =~ s/\x00+//g;
        $user =~ s/\x00+//g;
        printf(
            "%s %-8s %-12s %10s %-45s \n",
            scalar( gmtime( unpack( "I4", $t3 ) ) ),
            $type[
              unpack( "
I4", $type )
            ],
            $user,
            $line,
            $host
        );
    }
}
printf "\n" 

On your server, run the script as such

# wtmp.pl < /var/log/wtmp > /tmp/wtmp-report

You could change the input path to wherever your wtmp is stored. The final report opens with wordpad. In notepad the spaces are not recognized and it writes in a continuous lines so please use Microsoft Word or wordpad to read the report!

Scrip to convert IP to FQDN in SSHD logs

Tuesday, October 09, 2012 0 Comments

#!/bin/bash
cp sshd.log sshdn.log
awk '/Accepted/{a[$(NF-3)]++}END{for(i in a)print i}' sshdn.log|\
while read -r IP ; do
IPn=$(dig +short -x $IP)
sed "/Accepted/s/$IP/$IPn/" sshdn.log >sshdnn.log && mv sshdnn.log sshdn.log
done
more sshdn.log

Before

# more sshd.log
Apr 10 10:14:36 src@testlinux.site sshd[16795]: Accepted keyboard-interactive/pam for root from 191.255.XXX.XXX port XXXXX ssh2

After

# ./test 

Apr 10 10:14:36 src@testlinux.site sshd[16795]: Accepted keyboard-interactive/pam for root from lorem-ipsum.lorem.com.my port XXXXX ssh2

Changing default system mail recipient

Tuesday, October 09, 2012 0 Comments
What do you do when you get a request to forward root and system emails to a human user? Why you remove root user from the system mail recipient and add in human user email address. I wouldn't recommend this, because everything will get emailed to you instead of going into root user's mailbox on the host

Anyways, if you want to go ahead and do it, then this is how you do it. Please make a backup copy of /etc/aliases before you clobber it. I've tested this on Linux distros

# vi /etc/aliases
...
# It is probably best to not work as user root and redirect all
# email to "root" to the address of a HUMAN who deals with this
# system's problems. Then you don't have to check for important
# email too often on the root account.
# The "\root" will make sure that email is also delivered to the
# root-account, but also forwared to the user "joe".
#root:          joe, \root
root:           lorem@ipsum.com

Note : You have to run the command newaliases each and every time you modify the /etc/aliases file for new changes to take effect 

# newaliases

Convert Epoch command history logs into human readable format

Tuesday, October 09, 2012 1 Comments
Today we're going to discuss on how to customize user's command history logging and on converting Epoch command history logs into human readable history logs

In short

  • Customize C shell and Bash shell user's command history logging to store date-time of command executed
  • Store command history logs in different directory (not in user's home dir)
  • Store 20,000 lines of cmd executed into log file and allow system to remember 5000 cmds run at one time
  • Convert Epoch time to human readable time for all command history logs
  • Set up cron job to schedule conversion and housekeeping
Please ensure you have the target directories and empty log files already created to store the command history logs. On my server I store them in /var/log. Oh, and another thing, you got to make sure that the file's ownership is set to the user, if it belongs to root user the log files won't get written unto.

Cmd history logs
#/var/log/user_history/username_history
Epoch convert logs
#/var/log/user_history/Epoch_Convert/username

Lets start with the options I used to customise the cmd history logging. I edited the user's .bashrc or .cshrc profiles and add the following lines shown below at the end of their profiles. On some cases, you get users that have both .cshrc and .bashrc profiles, so to clear the confusion on which profile to edit, just do a "finger" on the user and you will find out its true shell profile.

Bash profile

export HISTFILE=/var/log/user_history/$(whoami)_history
export HISTFILESIZE=20000
export HISTSIZE=5000
export HISTTIMEFORMAT="%F %T "

If you're lazy then you can also make changes to the system wide profile, that is the .bashrc located in /etc/skel [for SLES] Make sure you take a backup copy of the profile before you start clobbering it

C shell Profile

echo "Date is: `date`" >> /var/log/user_history/sapadm_history
set histfile=/var/log/user_history/sapadm_history
set history=5000
set savehist=20000

I have also conveniently setup a script that stores all users' command history logging and put a cronjob to it, it runs once every end of the month to copy the logs into a month-stamped directory then nullifies the old log files

#!/bin/bash

HIST_DIR="/var/log/user_history"    #where my users' cmd history logs go to

MNTH_DEST_DIR="/var/log/user_history/old_logs/$(date +'%m')"    #where my users' cmd history logs go to end of the month

mkdir -p "${MNTH_DEST_DIR}"  #create an empty month directory (i.e 03 for March)

cp -p ${HIST_DIR}/*history ${MNTH_DEST_DIR}

cd ${HIST_DIR}

for i in /var/log/user_history/*history;  do    #I nullify the old logs after copying them to monthly dirs
  :>"$i"
done

While "history" command results in cmd history log with readable time stamp on it, when it gets saved the time stamps are automatically converted into Epoch/Unix time, so when the logs are saved they are all stored in seconds from 1 January 1970, so reading them is really cumbersome. Lets have a look into my cmd history log for root user from before and after conversion

#pwd
 /var/log/user_history/root_history

# tail root_history
#1349252703
ifconfig
#1349748599
cd /usr/local/bin/
#1349748630
ll

After conversion you will get a nicely formatted date and time stamp to go with each command:

#/usr/local/bin/epoch_converter >>/var/log/user_history/Epoch_Convert/root

# tail root
Wed Sep 26 12:08:33 JST 2012
/var/log/user_history/root_history
Wed Sep 26 17:05:39 JST 2012
ifconfig
Wed Sep 26 19:00:55 JST 2012
cd /usr/local/bin/

Tested on RHEL 5.3 and 6.3

# more /usr/local/bin/epoch_converter 

cat /var/log/user_history/root  | while read line ; do  if [[ $line =~ '^#' ]]; then  date -d "@$(echo $line | cut -c2-)"; else echo $line ; fi; done

Tested on SLES 10 and 11

# more /usr/local/bin/epoch_converter
cat /var/log/user_history/root  | while read line ; do  if [[ $line =~ ^# ]]; then  date -d "@$(echo $line | cut -c2-)"; else echo $line ; fi; done

If you're smart enough you will notice that the second script doesn't have quotations, if it did it wouldn't have worked on SLES. 

Of course no one wants to do this conversion job manually so I recommend you cronjob everything to make things easy for you

#cronjob to convert Epoch time in cmd history to human readable format

00 21 29 * * /usr/local/bin/epoch_converter >>/var/log/user_history/Epoch_Convert/root

While you're at it, its a good idea to schedule a job that runs every other month or so, depending on the size of your /var; to housekeep the converted logs. I am not a fan of removing log files, so I just nullify it:

#!/bin/bash

LOGS="/var/log/user_history/Epoch_Convert/*"
LOGS2="/var/log/user_history/Epoch_Convert/old_logs/$(date +'%m')"

mkdir -p ${LOGS2}

cp -p ${LOGS} ${LOGS2}/

cd ${LOGS}

for i in /var/log/user_history/Epoch_Convert/*;  do
  :>"$i"
done

If you any questions or recommendations please comment and I'll try to best to assist

Script to remove old nmon logs

Tuesday, October 09, 2012 0 Comments
I was having tons of nmon reports piling up on my servers so I decided to do a little Bash script to housekeep them on my Linux distros. Works on SLES and RHEL

#!/bin/bash
NMON_DIR="/var/nmon_reports/24hour"
OLD_NMON_DIR="/var/nmon_reports/old_logs"
cd ${NMON_DIR}
find . -name "*.nmon" -mtime +1 -exec gzip -9 {} \;
mv ${NMON_DIR}/*.gz ${OLD_NMON_DIR}

Monday, October 8, 2012

Friday, October 5, 2012

Taschen: Bought Monroe and the book of Symbolism

Friday, October 05, 2012 0 Comments
Always a fan of classic art, Monroe and her exoticism. So. I decided to buy these books from Kwerkee. They cost a fortune, but at least the fortune was a fraction of its Limited Eds version, which were all sold out by the way and cost about USD 2500 a pop [signed by the author of course]

Still I am glad I am getting these exotic books, mind you Symbolism was the era where painters were all experimenting on drawing actual body representation so a lot of half nudes and nudes. I just hope the retarded Malaysian customs officers don''t blackened out all my nude images, theres 766 pages to go thru and I'm likely to throw a huge fit if I find grubby fingerprints on my books


Monday, October 1, 2012